Email format error
Email cannot be empty
Email already exists
6-20 characters(letters plus numbers only)
The password is inconsistent
Email format error
Email cannot be empty
Email does not exist
6-20 characters(letters plus numbers only)
The password is inconsistent

Newsweek
Grasp current events and learn more about batteries
How to Install Your 48V DIY Battery Box Kit: Step-by-Step Guide
How to Install Your 48V DIY Battery Box Kit: Step-by-Step Guide
Installing a 48V DIY Battery Box Kit can seem daunting at first, but with the right guidance, it becomes a straightforward process. This step-by-step guide is designed to help you navigate the installation with ease, ensuring you get the most out of your battery box and improve your overall product experience. Whether you're using it for home energy storage, solar energy storage, or in your RV, this guide has you covered.

Why Choose the 48V DIY Battery Box Kit?
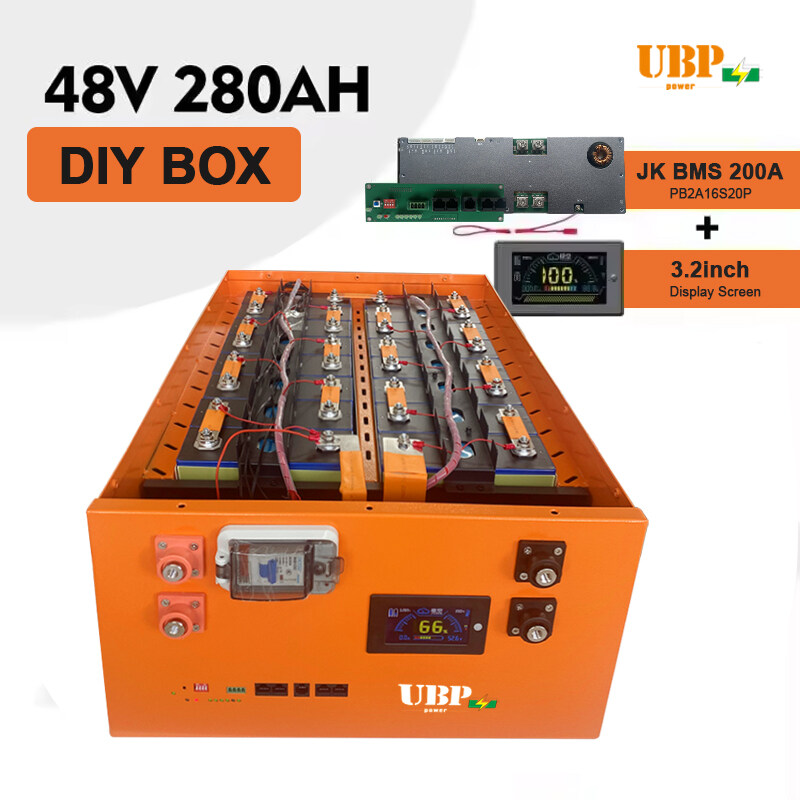
The 48V DIY Battery Box Kit offered by UBPPOWER is a robust and versatile solution for various energy storage needs. It features a durable metal construction with a built-in BMS (Battery Management System) rated at 48V 16S 200A. The kit also includes a choice between a 3.2-inch or 4.3-inch display screen for easy monitoring. It supports LiFePO4 battery types and is compatible with battery capacities ranging from 280Ah to 314Ah. With CAN/RS485/RS232 communication capabilities, this battery box kit provides seamless integration with other systems.
Tools and Materials Needed
- 48V DIY Battery Box Kit
- LiFePO4 Battery Cells (280Ah/302Ah/304Ah/314Ah)
- Screwdriver Set
- Wrench Set
- Multimeter
- Protective Gloves and Goggles
- Wiring and Connectors
Step-by-Step Installation Guide
Step 1: Unbox and Inspect
Upon receiving your 48V DIY Battery Box Kit, the first step is to unbox and inspect all components. Ensure that all parts are present and in good condition. If you notice any damage or missing items, contact UBPPOWER immediately for support.
Step 2: Prepare the Workspace
Set up a clean and organized workspace. Make sure you have ample lighting and all the necessary tools within reach. Safety is paramount, so wear protective gloves and goggles during the installation process.
Step 3: Install the Battery Cells
Place the LiFePO4 battery cells into the battery box. Ensure they are securely positioned and that the terminals are aligned correctly. Use the provided connectors to link the cells in the correct series configuration.
Step 4: Connect the BMS
Attach the Battery Management System (BMS) to the battery cells. The BMS is crucial for monitoring and managing the battery's performance, ensuring safety and longevity. Follow the wiring diagram provided in the kit to make the correct connections.
Step 5: Mount the Display Screen
Install the display screen on the battery box. Whether you choose the 3.2-inch or 4.3-inch screen, it should be easily readable and accessible. Connect the screen to the BMS according to the instructions.
Step 6: Final Connections and Testing
Make the final electrical connections, ensuring all wires are securely fastened. Use a multimeter to verify the voltages and continuity. Once everything is connected and verified, power on the system and check the display screen for correct readings.
Tips for Optimal Performance
To ensure your 48V DIY Battery Box Kit performs optimally, keep the following tips in mind:
- Regularly monitor the battery performance via the display screen.
- Ensure the battery box is stored in a cool, dry place away from direct sunlight and extreme temperatures.
- Periodically check all connections and tighten any loose bolts or screws.
- Follow the manufacturer’s guidelines for maintenance and safety.
Conclusion
By following this step-by-step guide, you can successfully install your 48V DIY Battery Box Kit and enjoy the benefits of reliable energy storage. For more information on our products and services, visit UBPPOWER. If you have any questions or need further assistance, feel free to contact us at +86 14767294217 or email us at chenjiali@ubppower.com.
With UBPPOWER's commitment to providing first-class solutions for global new energy applications, you can trust that our products will meet and exceed your expectations.

