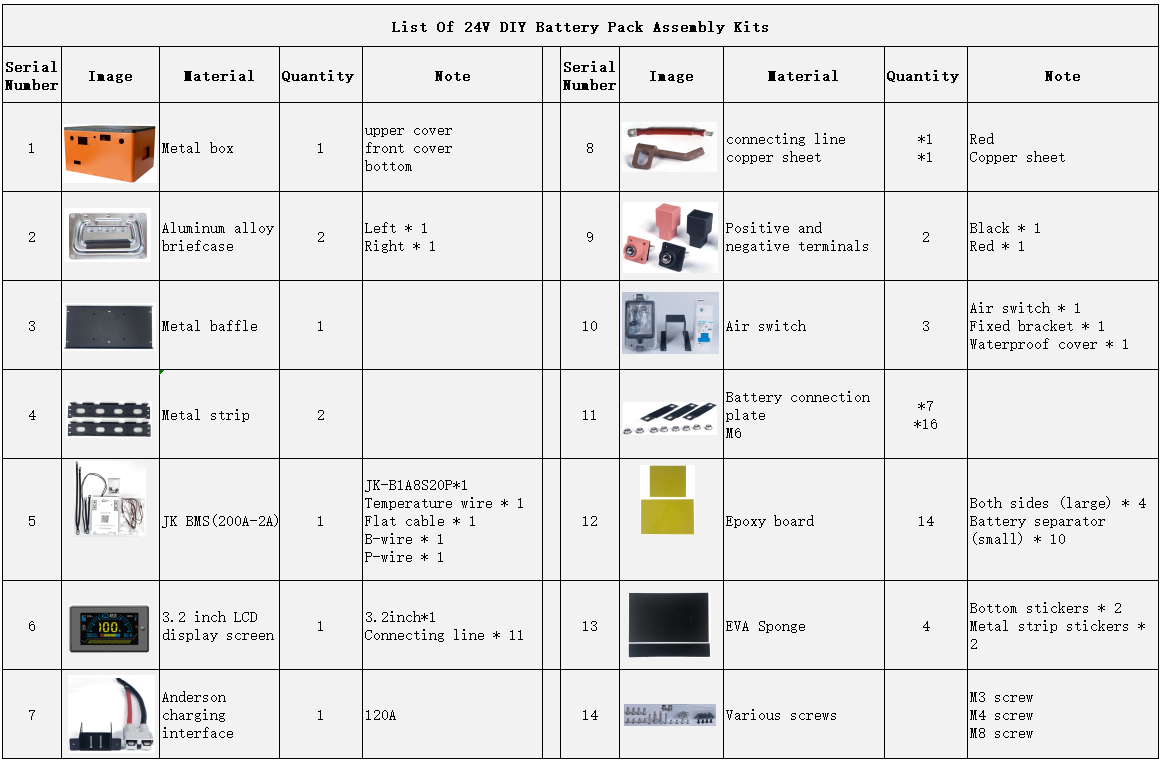
Welcome to the world of DIY 24V 280Ah battery pack! In this field full of infinite possibilities, with your own hands and wisdom, you will create a reliable and high-performance battery pack. This instruction manual will be your powerful assistant, accompanying you throughout the entire exciting DIY project from materials to final testing.
I .Assemble equipment.
Material link :www.ubppower.com
- Assemble strictly in accordance with the specifications and requirements of the battery. Do not exceed the rated voltage and current of the battery.
- Ensure that the battery is firmly connected and has good contact. Avoid looseness or poor contact that may lead to dangers such as heating and fire.
- During the assembly process, pay attention to preventing battery short circuits. Avoid direct contact between metal tools or wires and the positive and negative poles of the battery.
- During the use of the battery pack, pay attention to heat dissipation and avoid working in a high-temperature environment for a long time.
- Regularly check the status of the battery pack, including voltage, current, temperature, etc. Deal with problems in time when discovered.
- If you are not familiar with battery assembly, it is recommended to operate under the guidance of professionals.
II .Assembly steps
1. Battery inspection
1-1. Use a voltmeter to measure the voltage of each single battery to ensure that the voltage is within the normal range and close. If the voltage difference is large, parallel voltage equalization of the battery may be required.
1-2. Check the appearance of the battery to ensure that there is no damage, leakage, etc.
2. Assemble the face cover
2-1. Install the positive terminal (red), and just tighten the screws (Figure 1).
2-2. Install the negative terminal (black), and just tighten the screws (Figure 1).
2-3. Install the Anderson connector (120A). Just tighten the screws (Figure 2, Figure 1).
2-4. Install the air switch. The red wire (incoming wire) is connected to the total positive pole of the battery, and the copper sheet (outgoing) is connected to the negative terminal (Figure 3, Figure 1).
2-5. Install a 3.2-inch LCD display. Fix it on the back with 708 silicone rubber (Figure 1).
III.Assemble the fuselage.
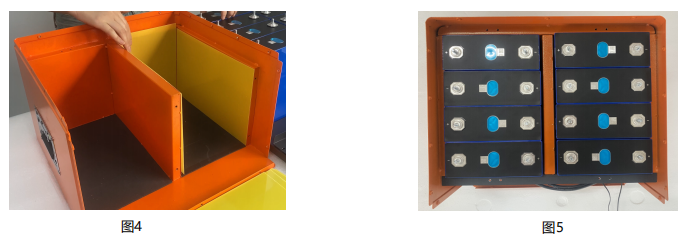
3-1. Install EVA sponge and epoxy board (Figure 4).
3-2. Install the battery and pay attention to the placement of the battery (Figure 4).
3-3. Install the protection board on the hardware board and tighten the screws. Fix the two wires with B- and P- on the protection board with M6 screws and insert the temperature wire (Figure 5).
3-4. Install the hardware baffle with the screw holes facing upward (Figure 6).
3-5. Install two metal strips and tighten the screws (Figure 7).
3-6. Install the connecting piece and pay attention to the placement position (Figure 8).
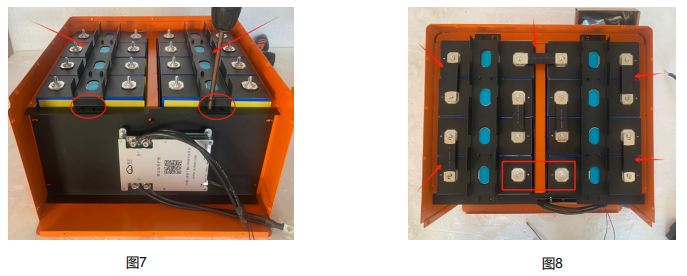
3-7. Install the flat cable. The black wire is connected to the total negative pole of the battery, and the others (red wires) are connected to the positive poles of the battery in turn (Figure 9).
3-8. Insert the flat cable into the corresponding position “B+B8B7B6B5B4B3B2B1B-” on the protection board (Figure 17).
3-9. Insert the LCD display cable into the corresponding position “display screen” on the protection board (Figure 17).
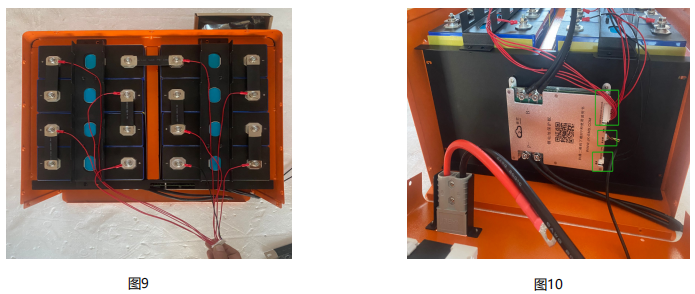
3-10. Arrange the flat cable (Figure 11).
3-11. Close the top cover (Figure 12) and tighten the screws (Figure 13).
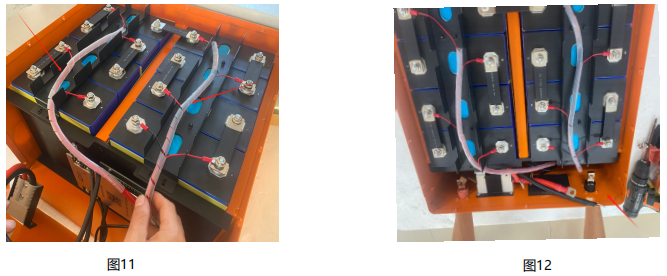
3-12. Connect the negative wire of the Anderson connector and the “P-” wire of the protection board to the negative terminal. Fix and tighten it with screws (Figure 14).
3-13. Connect the positive wire (red) of the Anderson connector and the copper sheet (brown) of the air switch to the positive terminal. Tighten the screws (Figure 15).
IV. Parameter Configuration and Debugging
1. Scan the "QR code" on the right with your mobile phone, download the "APP" of Jikong protection board and install it.
2. Press and hold the switch of the LCD display for 3 seconds to activate the protection board.
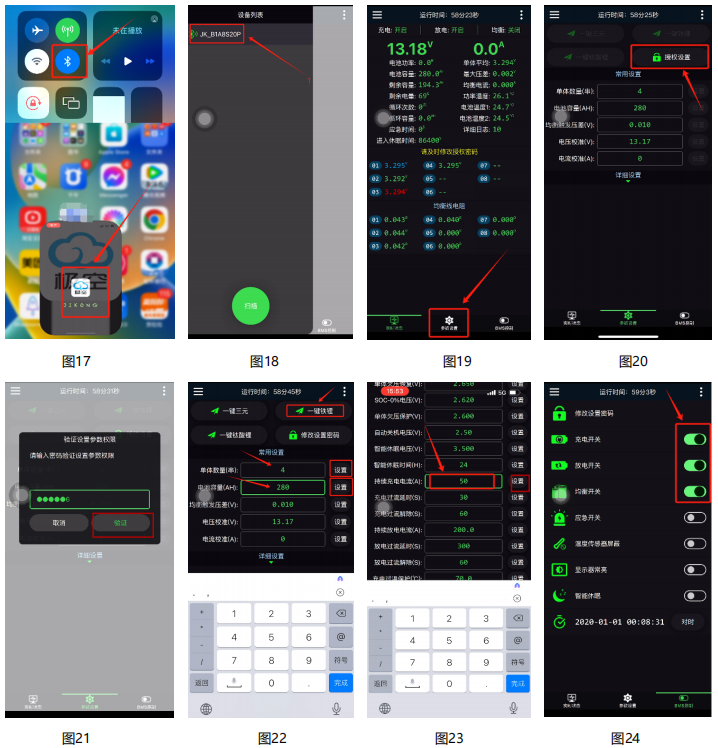
3. Turn on the Bluetooth of your mobile phone (Figure 17).
4. Open the installed "APP" of Jikong protection board and connect to "JK-B1A8S20P" (Figures 17 and 18).
5. Firstly, the default factory pairing password is 1234, and the default modification parameter authorization password is 123456.
6. Click "Parameter setting" (Figure 19).
7. Click "Authorization setting" (Figure 20).
8. Enter the password "123456" and click "Verify" (Figure 21).
9. Click "One-click lithium iron phosphate", set the corresponding parameters (the number of single cells (series) and battery capacity (Ah) as well as continuous charging current (50)), and click "Set". (Figures 22 and 23).
10. Click BMS control and turn on the charging switch, discharging switch and equalization switch (Figure 24).
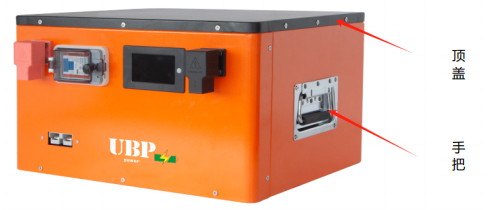
V. Close the cover and install the left and right handles.
After you assemble the 12V 280AH battery pack, the following precautions will ensure the safe, stable and long-lasting operation of your battery pack.
I. Charging precautions
1. Use a matched charger: Be sure to choose a charger specially designed for 24V large-capacity batteries. Avoid using an inappropriate charger, which may lead to abnormal charging, overheating and even overcharging and damage to the battery.
2. Control the charging environment: When charging, the battery should be placed in a well-ventilated, dry and suitable temperature environment. Avoid charging near high temperatures, humidity or flammable materials to prevent danger.
3. Monitor the charging process: During charging, regularly check the temperature and voltage of the battery pack. If abnormal temperature rise or unstable voltage is found, stop charging immediately and check the reason.
1. Avoid excessive discharge: Try to avoid completely discharging the battery pack to avoid irreversible damage to the battery. When the battery power is close to the low power warning, it should be charged in time.
2. Control the load: Ensure that the load connected to the battery pack is within its rated range to avoid overloading and causing overheating, shortened life or damage to the battery.
3. Prevent short circuits: During use, ensure that the wire connections are firm and avoid short circuits caused by looseness or poor contact. At the same time, prevent metal objects from accidentally contacting the positive and negative poles of the battery.
III. Storage precautions
1. Appropriate storage environment: If the battery pack is not used for a long time, it should be stored in a dry, ventilated and moderate temperature place. Avoid direct sunlight and humid environments.
2. Regular charging maintenance: During storage, the battery pack should be charged regularly to maintain the activity of the battery. Generally, it is recommended to charge once every few months.
3. Disconnect: When storing, the battery pack should be disconnected from external devices to prevent self-discharge or accidental discharge of the battery.
IV. Safety precautions
1. Take protective measures: When operating the battery pack, appropriate protective equipment such as gloves and goggles should be worn to prevent accidental injury.
2. Keep children away: Place the battery pack in a place where children cannot reach to avoid accidents.
3. Professional maintenance: If the battery pack malfunctions or is abnormal, do not disassemble or repair it by yourself. Seek the help of professionals.
If you need it, please click on our official website to contact us. Thank you.
www.ubppower.com
#DIY #DIYBATTERYBOX #24VBATTERYPACK #BATTERYPACK #DIY280AH #280AH #12V280AH


